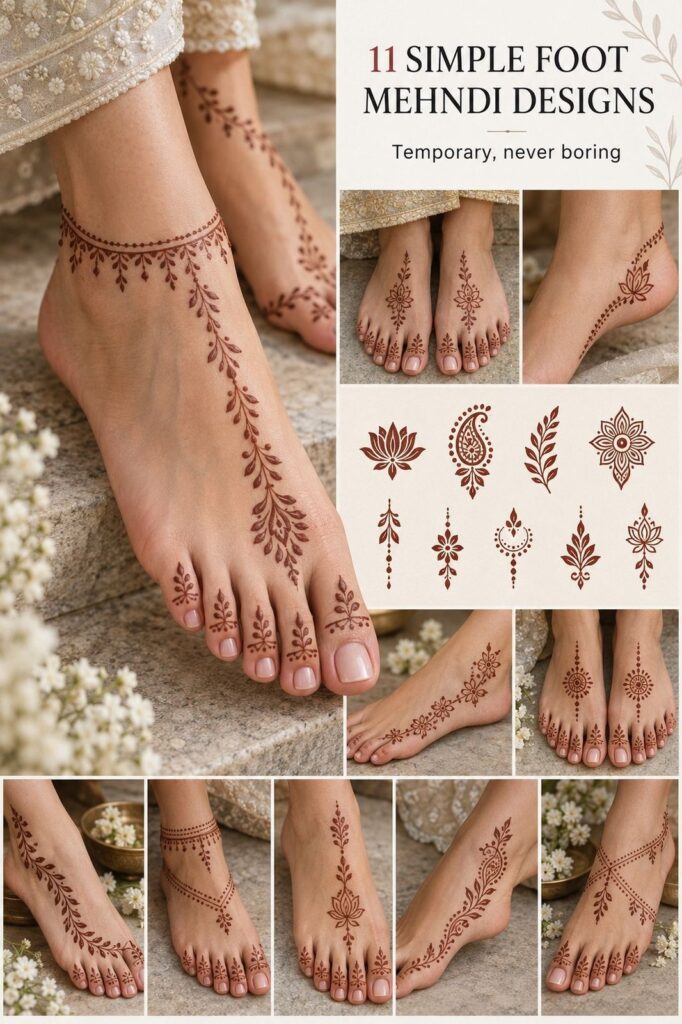
You want simple foot mehndi designs that still feel personal after the stain fades. I’ve learned that the cleanest designs begin with one private symbol, not a crowded reference sheet. This guide covers cone linework, placement, balance, drying, and mehndi artist choices so your finished stain feels deliberate. Start small!
Choose one memory, one feeling, and one visual idea first. Then use this meaning map, your preferred symbol choice, and a realistic aftercare plan to shape the final mehndi design. Henna is not a tattoo; it is a temporary paste applied with a cone.
Before You Start: The Three-Point Meaning Map
Choose one memory, one feeling, and one visual symbol before you contact a mehndi artist. Your memory might be a family tradition, your feeling might be courage, and your symbol might be a crescent, leaf, eye, or tiny sun.
That combination gives you a meaningful symbol instead of a borrowed motif. You’ll make stronger choices when you know what the design needs to say.
Write those three points in plain language. “I want something personal” isn’t enough. Try, “I want a delicate crescent to mark the year I started over.” That sentence gives your artist direction without forcing a literal illustration.
If you’re collecting simple foot mehndi designs, notice which shapes keep pulling your attention back.
Your foot is a demanding placement. Skin movement, friction, sunlight, and footwear can affect fine lines, so your mehndi artist will need to judge the exact area in person.
A delicate cone line can look crisp at first and soften as the stain fades. That isn’t a failure, but you’ll want spacing that allows the design to fade gracefully.
I’d avoid copying a full palm pattern directly onto your foot. Hands and feet move differently, and a dense design can lose its rhythm on a narrow surface.
If your private meaning needs to stay yours, use a symbol only you can decode. That small act makes the finished mark feel personal rather than generic.
What Should Your Symbol Carry?
Your first decision is emotional, not visual. Ask yourself what you want to remember when you see the stain without thinking about it. A sacred crescent, hidden initials inside a vine, or three dots representing people you love can carry more weight than a large collection of borrowed details.
Make the symbol readable at a glance. A tiny star can stay crisp when it has breathing space, while a complicated floral emblem may need more scale than you expect.
You don’t have to explain the meaning to anyone. Your artist only needs enough information to preserve the feeling in the cone work.
I’ve found that the strongest private meanings are slightly imperfect. A hand-drawn mark, an uneven petal, or a broken circle can feel more honest than a polished emblem. If you’re drawn to the latest simple foot mehndi designs, borrow the structure, then replace the central motif with something that belongs to your own story.
Keep a backup version of your idea. Your artist may tell you that a symbol needs to be simplified, widened, or moved away from a crease.
That’s useful advice, not a loss. A personal motif can change shape while keeping its emotional center intact.
A Quick Placement Check
Before choosing a final sketch, look at your foot while standing, sitting, and pointing your toes. The skin folds differently in each position, and a striking design can lose its clarity when a curved line lands across a crease.
Mark the possible placement with a washable pen. Walk for a few minutes, put on the shoes you wear most often, and check where pressure appears. This quick test can protect your budget because changing placement before the application costs less than correcting a poor decision afterward.
The best location depends on visibility, friction, stain development, and your preferred level of privacy. Compare your notes with this guide to foot-top and edge placements before you commit.
How to Prepare for a Private Foot Mehndi Application
Bring three references: one for line weight, one for symbol shape, and one for overall scale. Your mehndi artist doesn’t need a dozen nearly identical examples. A focused set makes the consultation sharper and leaves room for an expressive solution.
Tell the artist what cannot change. That could be the crescent, the number of dots, the location, or the memory behind the mark.
Everything else can remain flexible. A daring revision may improve the result without weakening its meaning.
Ask about the artist’s previous foot work, expected application time, minimum charge, paste ingredients, lemon-sugar seal, and aftercare instructions. These details help you judge whether the appointment is worth the cost and whether it fits your budget.
If you’re nervous, write your questions before you arrive. You don’t need to sound like an expert.
You only need enough information to make a confident choice. That matters!
- Start With Minimal Foot Mehndi Linework
- Pick Delicate Vines For Ankles
- Place Mandala Details Across Toes
- Keep Negative Space Around Symbols
- Plan Symmetrical Arches Over Foot Tops
- Choose Bold Henna-Inspired Sole Accents
- Trace Flowing Leaves Along Foot Edges
- Add Intricate Dots Beneath Ankle Bones
- Match Latest Designs To Skin Tone
- Balance Dainty Patterns Across Both Feet
- Protect Meaningful Mehndi During Drying and Aftercare
1Start With Minimal Foot Mehndi Linework

Begin with one central line and two supporting marks. Your foot version should remain minimal enough to read clearly from a distance.
A crescent, leaf, or curved petal can anchor the design, while tiny dots create rhythm around it. You’ll want the main shape to remain clear as the stain lightens.
Ask your artist to test the design on paper at the intended scale. A fine cone tip can produce delicate results, but extremely fine lines may dry pale or break up on a high-friction area. Your artist should show you fully developed stains, not only freshly applied paste.
I’d choose crisp spacing over extra detail every time.
Keep the first pass open. One curved stem, three dots, and a small symbolic center may look almost too simple on paper, but skin changes the scale. If you’re considering simple stylish mehndi designs for front-hand placement, use those references for line rhythm rather than copying their density onto your foot.
Traditional mehndi imagery can inspire the shape, while natural henna paste develops into a reddish-brown stain on the skin. A darker stain usually gives the cleanest contrast, especially when the design is small. The strongest result may be less ornate than your first sketch, and that restraint can make it more iconic.
2Pick Delicate Vines For Ankles

An ankle vine should follow the natural curve instead of wrapping like a rigid band. Start near the side of the foot, let the stem rise toward the ankle bone, and keep the leaves facing in alternating directions.
That creates a flowing silhouette. You’ll get a more graceful result when the vine has a clear beginning and end.
The ankle needs restraint. A flowing botanical stem with a few pointed leaves will look more polished than ten tiny leaves competing for space. I’d skip crowded petals near the ankle bone because friction can make the area visually noisy.
Ask your artist to leave the most delicate details away from the spot where your shoe edge rubs. A fine vine can still feel expressive when the main stem is confident and the leaves are spaced generously. If you’re saving simple trendy mehndi designs, look for references with visible open skin around the ankle.
You can make the meaning private by choosing leaves connected to a memory. Olive, fern, laurel, or a fictional leaf shape can each suggest something different without spelling it out. If the vine feels too feminine for your style, sharper leaves and a heavier stem can give it an edgy leaf profile.
3Place Mandala Details Across Toes

Toe placement works best when the design is divided into small, related units instead of one crowded panel. Start with a central dot or tiny circle on the largest toe, then repeat a reduced version across one or two neighboring toes. The result can feel ornate without becoming difficult to read.
A miniature mandala needs clean spacing between rings, especially where the toes bend. Your artist may simplify the outer points so the design stays recognizable after the paste dries and the stain develops. A tiny design can be bold when its silhouette is clear.
I’d avoid placing the most important symbol directly on a high-friction crease. Toes experience movement, socks, shoes, and daily contact, so placement deserves a practical conversation. If you’re comparing simple peacock mehndi designs, notice how the eye or feather details are protected by surrounding open skin.
Use one repeated element to connect the toes. Four dots, three petals, or a tiny scalloped edge can make separate marks feel intentional.
You don’t need every toe covered. A dainty toe constellation may say more than a full row of matching shapes.
4Keep Negative Space Around Symbols

Negative space is part of the design, not unused skin.

5Plan Symmetrical Arches Over Foot Tops

Foot-top arches need a clear centerline. Start at the base of the toes, sketch the highest point of the arch, and let both sides taper toward the edges. Symmetry doesn’t mean every tiny detail must match.
It means the overall weight feels balanced when you look down.
Choose a bold arch framework that matches your scale and application time. Foot placement can be sensitive because the skin is close to bone, and a long appointment may become uncomfortable simply from holding one position. Ask about the estimated drying and application time before you commit to the design.
Your artist should assess both feet separately. One foot may have a stronger curve, different pressure points, or more visible veins.
I’d rather have two related arches than two forced copies. A slightly different leaf or dot can make the pair feel alive and personal.
If you want matching designs with someone else, share the principle rather than demanding identical cone work. A crescent on one foot and a sun on the other can create a romantic conversation between the designs. If symmetry starts feeling too formal, break it with one symbolic asymmetry that carries your private meaning.
6Choose Bold Henna-Inspired Sole Accents

Sole accents require a practical decision before an artistic one. The skin experiences pressure, sweat, friction, and constant movement, so your artist may recommend a larger, simpler mark than the reference you saved.
A sole accent symbol can be powerful when it uses a clear shape, such as a dot cluster, short arch, or compact crescent. Avoid placing tiny internal details where they’ll be compressed by walking.
Ask how the artist’s previous sole mehndi stains developed and faded. A freshly applied photograph won’t tell you enough about longevity, color, or contrast. Good design stays readable!
The sole may suit you if privacy matters more than easy visibility. It may also fade faster with daily walking, so compare the expected cost and real duration with a foot-top design before booking.
7Trace Flowing Leaves Along Foot Edges

The outside edge of the foot gives a leaf design a natural path. Begin with one stem that follows the curve, then add leaves in alternating sizes. The same movement can become a flowing edge garland without filling every available patch of skin.
Choose leaves with clear silhouettes. A pointed leaf will remain sharper than a cluster of tiny rounded petals, especially when the design is viewed from the side. You’ll want the stem to do most of the visual work.
I’d avoid ending the vine abruptly at a pressure point. Let it taper before the area where your shoe or sandal touches most often. If you’re exploring simple mehndi designs, study how a single curve can lead the eye through a design without unnecessary density.
A leaf can hold a private meaning without looking literal. One leaf might represent a parent, a turning season, or a place you left behind.
Add one tiny dot beside it if you need a personal marker. The result can feel elegant, understated, and quietly powerful.
8Add Intricate Dots Beneath Ankle Bones

Dots are useful when you want detail without weight.
9Match Latest Designs To Skin Tone

Choose contrast with your artist, not from a screen preview. The final stain depends on undertone, paste quality, skin preparation, and the time allowed for development. A deep brown stain may read crisp, while natural henna can create a softer reddish-brown effect.
Ask to see fully developed stains on skin close to yours. Fresh paste can look olive-brown or nearly black in a photograph, while the actual stain deepens during the second day. You’re looking for a readable line, comfortable contrast, and a finish that still feels like you.
I’d skip choosing a color only because it looks fashionable in a social post. A timeless design should survive changes in your taste. If you’re browsing simple trendy mehndi designs, use current references for composition, then make the color decision based on your artist’s materials and experience.
Skin tone is not a limitation. It’s part of the design conversation.
A vibrant contrast, a softer brown, or a crisp natural stain can each look expressive when the line weight and spacing are right. Your artist should welcome those questions and answer them with examples.
10Balance Dainty Patterns Across Both Feet

Matching both feet doesn’t require identical designs. Begin by choosing one shared feature, such as the same central dot, leaf shape, or curved border.
Then let each foot carry a different supporting symbol. That creates balance without making the pair feel copied.
For both feet, reduce the density and keep the dainty paired symbols connected by one visual rule. One foot might carry a crescent, while the other carries a small star. The result can feel classic without becoming predictable.
Your artist should sketch both placements before starting. Stand, sit, and look down from the angle you’ll actually see most often.
I’ve seen balanced ideas lose their rhythm when one design sits closer to the ankle. A few minutes of checking can prevent a long-term annoyance.
If you want the designs to mark a relationship, avoid making one side entirely dependent on the other. Each design should still feel complete alone. That gives the pair a personal quality, and you won’t regret it if your style changes later.
11Protect Meaningful Mehndi During Drying and Aftercare

Plan your application around a quiet drying period. Foot mehndi can be affected by shoes, sweating, walking, sun, and water, so your schedule matters as much as the design. Let the paste dry for about 1 to 2 hours, then follow your artist’s advice about keeping it on longer.
Follow your artist’s instructions first. A lemon-sugar seal may help keep dry paste in place, while gentle scraping and limited water exposure can support a deeper stain. A natural aftercare balm may be recommended, but you shouldn’t add products your artist hasn’t approved.
Don’t judge the final color during the first few hours. Fresh paste may look muted, while the stain usually darkens on the second day.
You’ll want patience while the color develops. If the skin burns, blisters, or reacts unusually, remove the paste and contact a qualified medical professional.
Henna is temporary by design. Depending on paste quality, placement, washing, and friction, a foot stain usually fades in one to three weeks. Protect the meaning while it lasts!
The One-Stain Contrast Rule
I prefer designs that let one natural stain tone carry the private meaning. Too many competing colors can distract from the symbol, while one strong reddish-brown tone can make the linework feel polished and timeless.
A darkened stain can work beautifully for a symbolic leaf, crescent, or dot system. But the paste color on application day may not predict the final result on your skin. Ask about development time, maintenance, and whether the artist uses natural henna before you approve the price.
The rule is simple: let the symbol lead, and let color support it. If the color becomes the first thing you notice, the design may have lost its emotional focus. I’d choose a crisp single-tone piece over a complicated palette that needs constant explanation.
The Three-Scale Linework Check
Before the cone touches skin, view the design at three distances: close up, arm’s length, and across the room. Close viewing reveals whether the lines are clean.
Arm’s length shows balance. Distance tells you whether the central meaning still reads as a clear visual mark.
Ask your artist to show the sketch from several angles. Foot mehndi can change dramatically when you point your toes, stand naturally, or rotate your ankle. You’ll catch placement problems before the paste starts, which is the best possible time to change your mind.
“Simple” doesn’t mean empty. A restrained design can be striking when its line weight, spacing, and symbol work together. Your artist should be able to explain how the stain will develop, not merely show you freshly applied paste.
What to Ask Your Artist Before Booking
Ask how often the artist works on feet, how they approach fine lines, and whether they can show fully developed stains. A confident answer matters more than a stylish portfolio. You’re paying for technique, judgment, hygiene, and a thoughtful application.
Request a written estimate that includes the application time, deposit, expected cost, paste ingredients, and possible touch-up policy. Knowing the full price helps you compare value instead of choosing only the lowest fee.
Ask whether your preferred placement works with your footwear and daily routine. If you walk frequently, wear tight shoes, or work outdoors, the artist may suggest a more protected location.
Finally, ask what they’d change in your sketch. An honest critique can reveal whether the design is truly ready. The best consultation leaves you feeling informed, not rushed.
My Honest Rule for Private Foot Mehndi
I’ve changed my mind about meaningful mehndi more than once. At first, I wanted every important detail included: the date, the flower, the initials, and the tiny reference only I understood.
The result would have been crowded. When I removed half of it, the remaining symbol became more expressive and easier to enjoy before it faded.
That’s the part I’d emphasize to anyone planning simple foot mehndi designs. A mehndi design doesn’t need to function like a diary entry. It can be a quiet signal.
The strongest pieces often contain one detail that strangers see as ordinary while you know exactly why it’s there.
I also think artists deserve room to solve the technical problem. Your sketch may be meaningful, but your artist understands how a line behaves near bone, how a crease moves, and where friction will interfere. Bring the story, the reference, and the non-negotiables, then listen when the artist changes the shape.
For me, the best foot designs are not the largest or most elaborate. They’re the ones I can still recognize after the first excitement fades.
A personal cone motif with thoughtful spacing can feel more iconic than a crowded composition. You’ll know the idea is right when you stop collecting new references and start imagining the stain as yours.
A Few Things Worth Answering
How much does a simple foot mehndi design usually cost?
A simple foot mehndi application often falls between $20 and $100 in the United States, depending on size, placement, artist, occasion, and region. Many artists have a minimum of roughly $15 to $40, while custom bridal or highly detailed foot work can reach $100 to $300. Ask for a written estimate before booking so you can judge the value against your budget.
These are planning ranges, not a quote. Artist experience, local pricing, design density, occasion, and application time can change the final cost.
Are simple foot mehndi designs a good idea for a first mehndi application?
Yes, they can be a good first mehndi application when you choose a manageable placement and a clear design. Foot skin experiences friction, but minimal cone work lets you start with something understated personal art rather than an oversized commitment.
– Clear symbolic meaning – Simple line structure – Artist-reviewed placement – Realistic drying expectations
How do I choose a mehndi artist for simple foot mehndi designs?
Choose an artist with clean cone work, fully developed stains, and strong hygiene practices. Ask whether they’ve worked on feet before and whether their portfolio includes the type of intricate mehndi-inspired design you want. A consultation is worth the time if it helps you compare technique, cost, paste quality, and real duration.
– Developed stain photographs – Fine-line and traditional examples – Relevant foot-placement experience – Clean, hygienic practice
How does a simple foot mehndi application feel?
A henna application should not feel painful. You may notice the cone moving across the skin or feel mild tightness as the paste dries, but burning or persistent discomfort is a reason to remove the paste and ask the artist what was used.
– Light cone pressure – Paste drying on the skin – A quiet drying period – Personal skin sensitivity
How long do simple foot mehndi designs last?
A foot mehndi stain usually lasts one to three weeks, depending on paste quality, washing, friction, footwear, and skin turnover. The color may deepen on the second day before gradually fading.
– Paste drying: 1 to 2 hours – Darkest color: around day two – Typical duration: 1 to 3 weeks – Gentle washing after removal
What’s the best placement for simple foot mehndi designs?
The best placement depends on visibility, friction, stain development, and your design’s line weight. The foot top and outer edge often give a clearer area than the sole, while the ankle can suit a flowing symbolic vine.
– Foot top for visible linework – Outer edge for discreet symbols – Ankle for curved vines – Artist-approved placement
Where I’d Start First
If I had to pick one step, I’d start with minimal foot mehndi linework. A single symbolic curve gives your artist room to protect spacing and stain clarity, while a crowded design can fade before its meaning settles. Save your strongest reference, show it at the consultation, and let the final mark stay personal.


