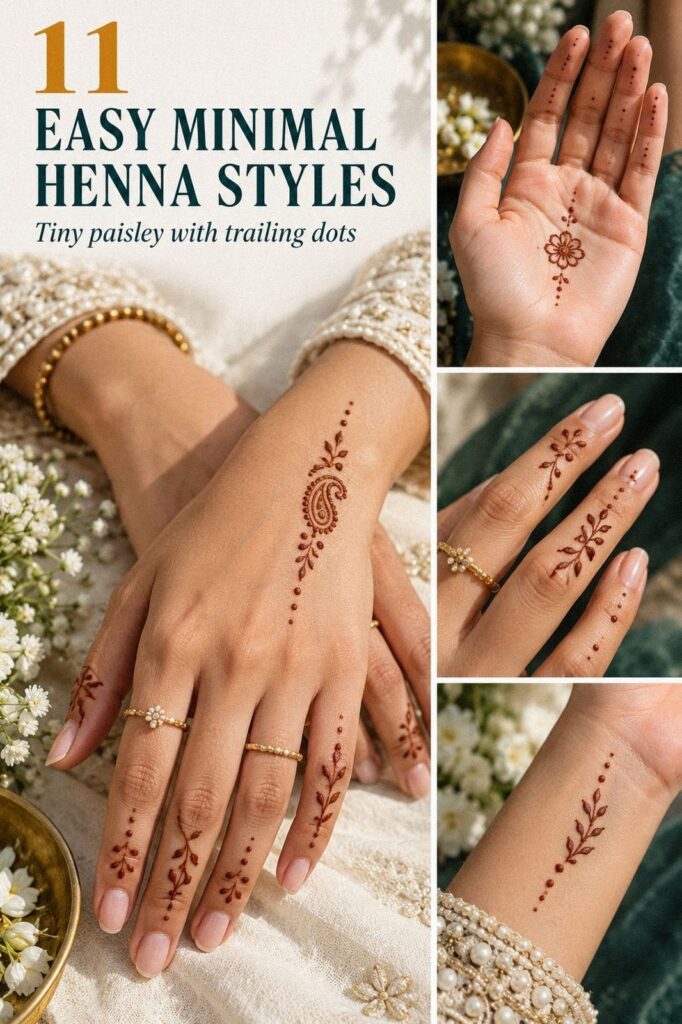
Easy minimal henna designs should dry in about 1 to 2 hours and fade within 1 to 3 weeks. I once covered a simple motif too quickly and blurred every edge. Now I leave breathing room, use a crisp brown-red stain, and let the color deepen on the second day. That small pause changes everything!
- Trace Delicate Finger Vines With Tiny Henna Dots
- Build a Minimal Palm Mandala With Crisp Linework
- Build a Flowing Henna Bracelet Around the Wrist
- Where Should a Crescent Moon Sit?
- Trace Dainty Henna Leaves Along One Finger
- Use Latest Geometric Henna Lines For Hands
- What Can a Bold Central Dot Do?
- Let the Sunburst Speak for Itself
- Contrast: Side-Hand Henna With Negative Space
- Add a Playful Heart and Flourish Finger Design
- Echo the Vines With Graceful Ankle Henna
1Trace Delicate Finger Vines With Tiny Henna Dots

This delicate finger design follows the back of the hand with thin vines that climb toward each fingertip. Use a natural henna cone with a narrow opening, then draw one curved stem at a time.
Tiny dots sit beside the bends, so your hand still shows plenty of skin. The result is expressive and personal without looking unfinished.
You’ll want to begin near the wrist and work outward, because your palm may brush the fresh paste if you start at the fingers. I prefer three dots in one cluster rather than five. That smaller group looks more polished on a brown-red stain.
If you’re practicing, copy the spacing from these simple minimal henna designs before trying your own variation. A single dot cluster can teach you more about cone pressure than a complicated pattern.
Try this pattern on one hand first. Your other hand can carry a single tiny leaf, which keeps the pair graceful instead of overly matched. Thin vine trails, open curves, and visible skin make this choice especially beginner-friendly.
Don’t chase perfect symmetry. Your natural finger shape will make each side look slightly different, and that’s part of the charm. Keep the fresh paste narrow, and stop before the design becomes crowded.
For another idea, compare the lighter spacing in these Pakistani henna designs. You can borrow one small curve without copying the entire pattern.
2Build a Minimal Palm Mandala With Crisp Linework

A minimal palm mandala gives you a crisp center without filling every inch of skin. Start with a small circle, then surround it with four pointed petals and four tiny dots. The shape is symbolic and meaningful, but it doesn’t need heavy borders or dense shading to read clearly.
I’d keep the center about the width of your thumbnail, especially if you’re drawing this yourself. A larger mandala can become muddy when the paste spreads, while a smaller one stays elegant. Add a fine wooden cone tip if your paste feels thick, and test one curved petal on paper first.
Keep your fingers relaxed while the pattern dries. Tense hands make the skin pull, which can turn a smooth arc into a jagged one. If you want a second reference, compare the open spacing in these simple henna designs.
For a more ornate version, place one short ray between each petal. I’d skip full palm coverage here. The negative space is what makes the mandala feel timeless, modern, and easy to wear.
A small palm mandala can be worth the effort when you want symbolism without a long application. It’s also a good value choice for a wedding or festival because the pattern looks considered with very little paste.
You could add a tiny paisley at the base, but I’d keep the center untouched. The contrast between a clean circle and a few intricate marks gives the design an iconic quality.
3Build a Flowing Henna Bracelet Around the Wrist

A flowing wrist bracelet works like a delicate border, but it shouldn’t sit as a heavy solid band.

4Where Should a Crescent Moon Sit?

A simple crescent moon can sit near the thumb, along the side of the palm, or at the center of the back of the hand. I like the side-hand placement because the moon curves with your natural movement. Add three small stars or dots, but leave the surrounding skin open so the symbol remains sharp.
Use a reddish-brown paste and let the crescent dry without adding thick filler. A moon that is too wide loses its delicate shape after the color deepens. You’ll get a more refined result by outlining one slim crescent and adding a few short rays along the outer edge.
Don’t copy a design only because it photographs well. Ask yourself what the moon means to you, and choose the side-hand placement you’ll enjoy seeing during ordinary moments. These minimalist henna designs have the same understated energy.
For a playful variation, put one dot inside the crescent. For a more sacred look, surround it with a tiny halo of evenly spaced dots. Both versions stay simple if you protect the open skin.
A crescent is often worth it when you want a meaningful result on a small budget. The moon motif uses little paste, takes limited time, and still feels striking.
5Trace Dainty Henna Leaves Along One Finger

This dainty leaf trail follows one finger from the base toward the fingertip.
6Use Latest Geometric Henna Lines For Hands

Latest geometric henna lines look bold when they use fewer marks. Try one triangle at the center of the hand, two parallel lines toward the wrist, and a row of dots along one finger. The structure feels edgy and modern, while the reddish-brown paste keeps it connected to traditional mehndi.
Use a smooth cone line with steady pressure. Press slightly harder for the central shape and lighten your hand for the outer details. You’ll want to test the flow first, because a broken line can interrupt the whole rhythm.
If you’re drawing on deep brown skin, keep the shapes slightly larger so the stain remains visible as it fades. I wouldn’t combine three unrelated symbols. Pick one geometric anchor and repeat its angle elsewhere.
These geometric henna designs are useful for studying clean spacing. One central triangle, two long rails, and a crisp dot row can create a powerful result without expensive supplies.
If your first attempt looks too rigid, soften one corner with a tiny leaf. The contrast between strict geometry and organic detail can feel daring, expressive, and surprisingly balanced.
Let the brown-red color do some of the visual work. You don’t need additional filler when the angles are sharp and the spacing is deliberate.
7What Can a Bold Central Dot Do?

A bold central dot gives a back-of-hand design an immediate focal point.
8Let the Sunburst Speak for Itself

A symbolic sunburst brings a powerful focal shape to the palm. Start with a small center circle, then draw short rays in alternating lengths. Leave a gap between the rays so the design feels vibrant rather than solid.
Choose a fine natural henna paste that spreads smoothly. Palm skin moves constantly, so your lines should be clear but not raised into thick ridges. I’d draw the shortest rays first, then extend only the ones that need more balance.
Could a palm design be meaningful without filling the whole hand? Absolutely. The open areas make this motif feel sacred and modern, while the sun itself can represent energy, renewal, or family.
If you want a matching pair, place the sunburst on one palm and three small rays on the other. These simple mehndi designs for the front hand can help you adapt the scale.
The color will deepen on the second day, so don’t judge the finished look immediately. Give the sunburst motif time to settle before deciding whether it needs more detail. Small motifs can still feel special!
Keep the short rays uneven but balanced. Perfect repetition can make a hand design look mechanical, while slight variation gives it a more expressive quality.
9Contrast: Side-Hand Henna With Negative Space

Side-hand henna looks elegant because the pattern follows the edge instead of covering the center. Draw a narrow chain of leaves from the base of the thumb toward the wrist, then add one curved flourish near the palm.
The untouched middle becomes part of the design, giving it a sleek and refined shape. Use a thin paisley chain and keep each motif pointed in the same direction.
Your side hand may be harder to reach, so work slowly and support your wrist on a folded cloth that won’t touch the wet paste. I’d rather see three clean leaves than ten blurred ones.
And don’t let the phrase negative space make the design sound complicated. It simply means you’re choosing where not to draw. That choice makes the pattern feel polished, intimate, and quietly striking.
For more examples, browse these Pakistani henna designs and remove the dense fills. This option is often worth the money when you want a distinctive result with limited application time.
The side-hand chain can also work as a partial border. Stop before the thumb joint, then leave a clear break so the motif doesn’t become visually heavy.
10Add a Playful Heart and Flourish Finger Design

A playful heart adds a romantic detail to a minimal finger design. Draw one small heart near the base of the finger, then let a curved flourish trail upward toward the fingertip. Two tiny dots can sit beside the heart, but leave enough skin around the shape to keep it readable.
Try a smooth heart outline rather than a filled center. Your paste will dry faster, the motif will stay clear, and the open middle keeps the design light.
If you’re making this for a friend, change the flourish into a shared initial shape or a tiny leaf. That makes the result personal instead of copied. I’d skip placing hearts on every finger, because one heart feels meaningful while five can look busy.
These easy henna designs for hands offer other small motifs you can pair with the flourish. For a feminine finish, add one crisp dot beneath the heart. For a bolder version, extend the flourish across the back of the hand.
A single romantic motif can feel more expressive than a repeated row. Keep the heart slightly off-center if you want the result to look playful rather than formal.
11Echo the Vines With Graceful Ankle Henna

A graceful ankle design can echo the finger vines while staying slightly wider for the available skin. Draw a low curved stem above the ankle bone, then add three leaves and a few dots toward the foot.
Use a natural henna cone and avoid placing wet paste where a shoe strap will press. Your ankle needs enough time to dry undisturbed, especially if you’re preparing for a wedding or festival.
I’d choose a simple curve over a full band because it moves better and fades more evenly. When I draw ankle motifs, I place the heaviest detail near the center and taper both ends.
These simple minimal henna designs can help you reduce a larger motif into three clear elements. A small ankle design can still feel bold, classic, and polished.
Keep the stain rich, the spacing deliberate, and the outer lines crisp. You’ll get an ethereal result that works with sandals, bare feet, or a festive outfit.
A narrow ankle vine is especially useful when you want a graceful echo of the hand design without repeating every detail.
Choose Placement Before You Choose Detail
Your hand, palm, finger, wrist, foot, or ankle should guide the motif. I’ve made the mistake of choosing a pattern because it looked impressive in a close-up photograph, then discovering that the details were too dense for the placement.
Start with the back of the hand if you want an easy surface to see while working. Choose the wrist when you want a bracelet effect, or the side of the hand when you prefer a sleek design that stays partly hidden.
The best value usually comes from a pattern that suits your natural movement. You won’t need to correct it constantly, and the finished result will feel more personal.
Before spending money on a larger appointment, test a small version on paper. You’ll learn whether the motif feels graceful, fierce, or too busy for your taste.
For more placement ideas, compare the open shapes in these traditional henna designs. Dense examples can often be reduced to one border, one symbol, and a few dots.
Choose the wrist line when you want a design that can be hidden or shown easily. It’s a stylish compromise between a tiny finger mark and a larger palm pattern.
Make the Cone Do Less
Minimal henna depends on controlled pressure. A narrow cone opening creates crisp lines, while a wide opening can make small details spread together. Practice dots, leaves, arches, and short curves before attempting a full mandala.
Fresh henna paste should move smoothly without spluttering or breaking. If it feels dry, the line may skip. If it feels too loose, the design may lose its sharp edges.
Don’t measure success by how much paste you use. A small amount can create a more intricate impression when the spacing is deliberate. That’s what makes a minimal pattern feel stylish rather than unfinished.
If you’re unsure which cone to buy, compare ingredient quality and flow instead of choosing the lowest price. A slightly better cone can be worth it when it prevents wasted paste and repeated practice.
Look at geometric henna designs to study how much visual impact comes from simple marks. The strongest patterns usually rely on rhythm, not quantity.
Use steady cone pressure for long curves, then lift the tip cleanly at the end. A confident stop makes even a short line look polished.
A Small Budget Check Before You Start
Your total cost depends on whether you work at home or book a mehndi artist. The ranges below are practical planning estimates, not fixed prices. A simple design can stay affordable, while a wedding pattern requires more time and detail.
For most beginners, the best value is a natural cone and a few minutes of practice. You don’t need to spend heavily before you know which placement suits you.
Ask about ingredients, drying time, and what the quoted price includes. A clear mehndi artist should explain the process without pressuring you into a larger design.
If you’re comparing appointments, consider the cost per hour and the amount of paste involved. A small, meaningful motif can be more affordable than a dense design that you’ll tire of quickly.
For a realistic starting point, use the cost range for one cone, practice paper, and basic aftercare. That small kit can support several attempts.
If you’re unsure whether to book help, compare the application time in these simple henna designs with the design you want. A simple pattern may not require a long appointment.
The Henna Choices I’d Make With My Own Hands
For a first attempt, I’d choose the finger vine or the crescent moon. Both are forgiving because you can stop after a few marks and still have a complete design. A mandala asks for more balance, while a geometric pattern asks for steady pressure.
The paste matters too. I like a natural reddish-brown result, and I’m wary of very dark products with unclear ingredients. Your skin deserves careful treatment, especially when you’re leaving the paste on for 1 to 2 hours.
Here’s my honest rule: stop before you think you need one more detail. Minimal henna looks strongest when the empty skin has a job. A single dot, a clean leaf, or one open curve can carry more personality than a crowded palm.
If you’re preparing for a wedding, sangeet, Eid, or Diwali, test the design and placement beforehand. You’ll know what feels comfortable, what photographs well, and what still feels like you. That preparation can save both time and money!
For more inspiration, compare the open motifs in these minimalist henna designs before choosing a final pattern.
My personal finger vines pick is the smallest version, with three leaves and no extra border. It looks empowering because it leaves room for your own hand to remain visible.
If symbolism matters most, the crescent moon is my favorite. It’s meaningful without demanding a large area or a long application.
For an event, I’d choose a wedding mehndi variation with one central motif and open fingers. It can look vibrant in photographs while staying comfortable as the paste dries.
How Long Does Minimal Henna Take to Dry and Fade?
These timings are useful for planning your design, but your result can vary with skin, placement, washing, and the paste itself. Palms often develop a deeper stain than the back of the hand, while feet may fade faster where shoes rub.
You’ll want to keep the paste still while it dries and avoid judging the color too early. The most noticeable change usually happens after the first day.
A simple care routine helps your pattern last. Wash gently, moisturize when the skin feels dry, and limit strong sun or pool exposure while the stain is visible. Lemon-sugar seal can help keep dried paste attached, but use a light amount rather than soaking the design.
The paste drying stage is complete when the surface feels firm rather than wet. Avoid bending the marked area repeatedly during this window.
The color deepening is gradual. A stain that looks orange at first can become a richer brown-red by the second day, so patience matters.
Expect visible wear after one to three weeks. Friction, washing, skin type, and placement all affect how quickly the edges soften.
FAQ: Easy Minimal Henna Designs
Can I Make Easy Minimal Henna Designs at Home?
Yes, you can make these designs at home with a cone, paper practice sheets, and a steady surface. Start with dots, leaves, arches, and short curves before attempting a full palm mandala. Your first design doesn’t need to look intricate to feel expressive.
Choose practice paper that won’t absorb paste too quickly. You’ll learn how much pressure creates a fine trail and how much spacing your hand needs between motifs.
You can also compare the beginner shapes in these simple henna designs before choosing a pattern. Copying one small element is enough practice.
Which Henna Placement Is Easiest for Beginners?
The back of the hand, wrist, and outer forearm are usually easier than the palm because the skin is less creased and easier to see while you work. Fingers can be simple too, but their narrow surface makes spacing more important.
Your feet and ankles can carry graceful designs, although shoes and straps may rub the paste. Try a small ankle vine first, and choose a time when you won’t need to walk around immediately.
For a more delicate option, review these minimalist henna designs and choose a motif with fewer curves.
What Color Should Minimal Henna Be?
Natural henna usually leaves a reddish-orange mark that deepens into brown-red over the second day. The final tone can look different on fair, olive, golden tan, and deep brown skin, so you shouldn’t expect one identical result.
I prefer a brown-red stain because it looks classic and lets the design remain visible without appearing harsh. Test a small area if you’re working with a new paste, and stop if your skin reacts.
Avoid products with unclear ingredients or unexpected coloring. Natural henna should develop gradually rather than appearing unnaturally dark immediately.
How Should I Choose a Mehndi Artist?
Look for clear photos of dried results, clean cone control, and designs that match your preferred level of detail. You’ll want an artist who understands spacing, skin tone, and the difference between a palm motif and a wrist motif.
Ask about ingredients, drying time, and care before the appointment. A thoughtful mehndi artist should explain the process plainly and give you time to choose a placement that feels comfortable.
You can also browse traditional henna designs and point out which details feel too dense or too ornate for you.
How Long Should I Leave Henna Paste On?
Leave the paste undisturbed for about 1 to 2 hours, or until it feels dry and firm. Longer contact may deepen the stain, but you’ll still need to follow the paste maker’s directions and your artist’s advice.
Remove the dried paste gently instead of scrubbing. Your color may look light at first, then become darker by the second day. That gradual change is normal for natural henna stain.
If you’re unsure about care, compare the aftercare guidance in these simple minimal henna designs before applying a larger motif.
Is Henna Good for a Wedding or Festival?
Yes, henna is especially fitting for weddings, sangeet celebrations, Eid, Diwali, and other gatherings where temporary body art feels meaningful. You can choose a symbolic sun, paisley, heart, mandala, or family-inspired motif.
For a busy event, pick a design that dries before you need to dress. Your hands will be easier to manage with an open festival henna design than with dense paste across every finger.
A small design can still feel romantic, sacred, or empowering. The meaning comes from the symbol and the occasion, not from covering every available space.
Where I’d Start First
If I had to pick one, I’d start with the delicate finger vines. They’re easy to scale, they leave your hand visible, and the dots still look intentional when your cone pressure isn’t perfect.
A crescent moon would be my second choice if symbolism matters more than practice. For the lowest cost, choose the central dot or a single leaf trail. Both use little paste and still look personal.
Pin the idea for later, compare it with these geometric henna designs, and choose the placement before you begin. The strongest minimal design is the one you’ll enjoy seeing after the color deepens.
If you want a softer starting point, choose one leaf, one curve, and three dots. If you want something sharper, choose the geometric triangle.
Either way, let the open skin remain part of the design. That’s the point!


One response to “Easy Minimal Henna Designs for the Back of the Hand Anyone Can Do”
[…] keeps every line readable after the stain darkens. Pin the idea for later and compare it with these simple minimal henna designs before your next evening […]